Table of Contents
List of Figures
- 2.1. Main Admin Page
- 2.2. List of Lists Page
- 2.3. Members of List Screen - Used to Add a User to the Mailing List
- 3.1. PHPList Taskbar
- 3.2. PHPList Screen for Creating Messages
- 3.3. Template Choice Box
- 4.1. Link Dialog Box
- 4.2. Image Properties Dialog Box
- 4.3. Browsing for Images and Uploading them to the Resources Browser
- 5.1. Send a Test Message Option
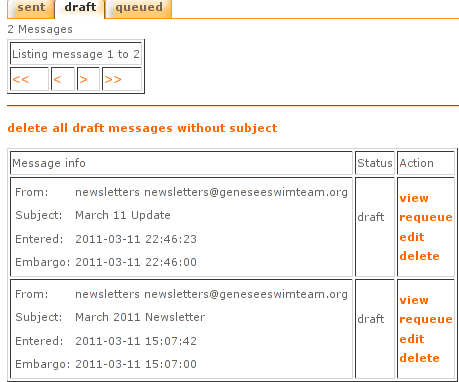
- 6.1. Finding a Draft Message
- 6.2. Selecting a List to Send the Message
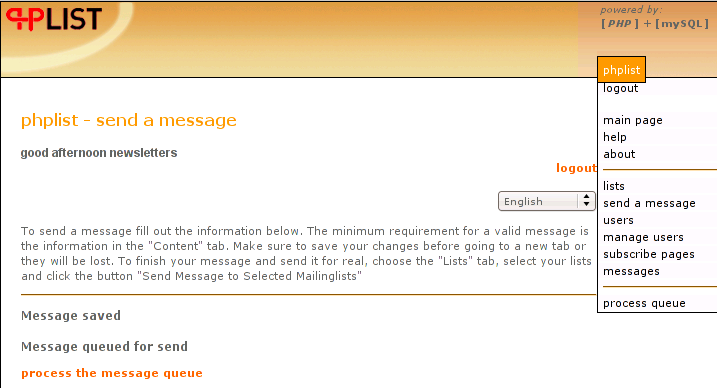
- 6.3. Screen for Processing the Message Queue
- 7.1. Phplist list of Messages
- 7.2. Phplist View Page
- 7.3. Link Dialog Box Showing Protocol as "other" and URL for Retrieving Newsletter
Many organizations have a need to send updates or newsletters to a group of members or customers. This communication is most effectively done electronically via email, and the emails are most effective if they include "branding" elements, such as a logo or standard template, as well as other images and graphics. This requires an HTML-formatted email.
PHPList is a web-based application that allows users to create HTML-formatted emails, using pre-defined templates. Users can insert images and links, just as they would in a web page. PHPList also allows users to create and maintain a variety of mailing lists that can be used to distribute the updates and newsletters.
Before you create a newsletter, you need to create and populate your mailing list in the PHPList system. Go to your login page (the URL will have been supplied by your webmaster; it will probably be http://your-domain.com/lists/Admin) and sign in with your user id and password (also supplied by the webmaster). This will bring you to the main admin page.
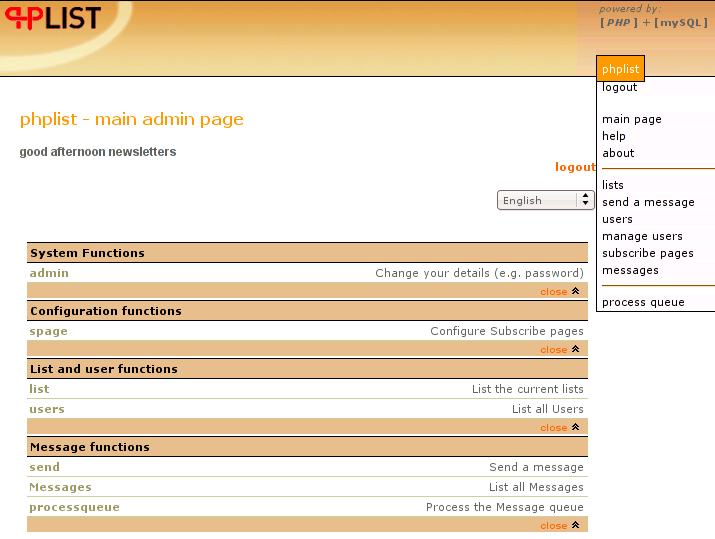
Click on "list" under "lists and user functions". This will bring up the "list of lists", which will show a test list (if there is one) and allow you to add a new list by clicking on "add a list". Give your list a name, check the box to make it active, and then save the list.
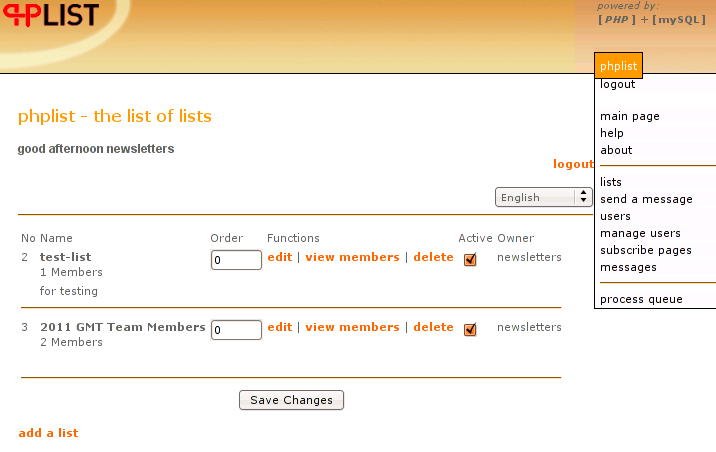
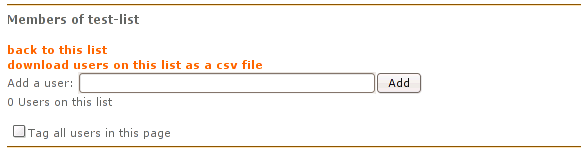
Once you save the list, you wil be returned to the "lists" page and you will see the list you just created. Select "view members" and it will bring you to a screen where you can view all the users in the list and add users (in PHPList terms, members of lists are called users). Type your user's email address in the "Add a user" box. If this user exists on another list, it will say "user found, click add to add this user", and you click "add". If you are adding someone new, it will say "no user found with that email". Just check the "I prefer to receive emails in HTML format" button, click on "add user", and that person will be added to the list.
Continue adding users until you have entered you entire mailing list. You can add people to the list (or delete them from it) at any time. Also, you can add as many email addresses as you need. Once you have entered the entire mailing list, it is automatically saved, so you can proceed to sending a message or exit the system.
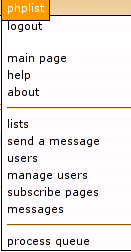
To create a newsletter or other message, login to the main admin page (url, user name, and password will have been supplied by your webmaster) and select "send a message". If you are already logged in, you can navigate to this page by choosing "send a message" from the task bar in the upper right corner of the screen.
Give your message a subject, such as "Meeting on June 4th" if it is a quick update, or "July Newsletter" if it is a newsletter. It is helpful for those on your mailing list if you keep the titles short and somewhat standardized.
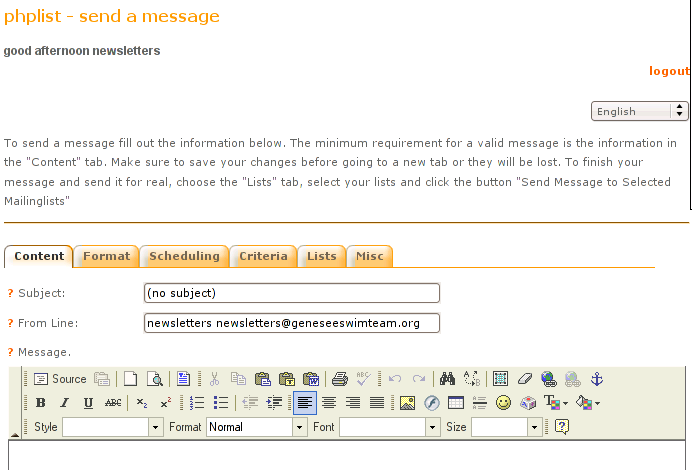
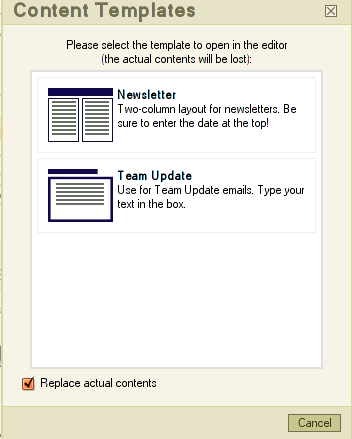
Then, move to the toolbar and select the template icon.
 Choose the template appropriate to the message you
are creating. Your webmaster should have worked with you to develop
templates for your organization.
Choose the template appropriate to the message you
are creating. Your webmaster should have worked with you to develop
templates for your organization.
For either format, you should start by entering the date in the designated area.
Then simply type the text into the text box. In formatting your
message, you have all the standard options in the tool bar - bold,
italicize, change font color, etc. Once you have completed your message,
scroll down and click on "save changes". 
When you have added all your content, you can enhance your message by adding links and/or images. Once you have the message looking the way you want it to, it is time to send a test message, so that you can make certain that the message looks the same when it is sent via email. These processes are explained in the subsequent chapters.
Adding links helps your user navigate to important websites and documents mentioned in your newsletters, and images enhance the look of your message, and make it appear more polished.
To add a link, highlight the text that you wish to become a link,
and click on the link icon.  This will bring up the link dialog box.
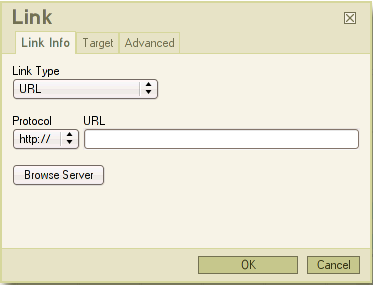
Type in the url of the site or document you wish to link to. Next, you need to set the target, so that when someone clicks on the link, it will open in a new tab (rather than forcing them to navigate away from your website or newsletter). Click on "Target", and it will open up the target setting box. Choose "New Window" (blank) from the drop-down menu, and click "OK", and your link will be established.
To add an image, move the cursor to the place where you would like
to insert the image, and click on the insert/edit image icon.
 This will bring up the Image Properties dialog
box.
This will bring up the Image Properties dialog
box.
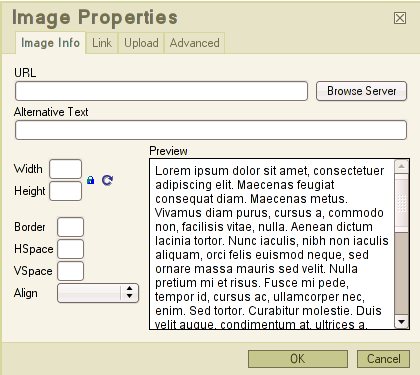
From this box, you need to click on "Browse Server" to locate the image you wish to insert. This will bring up the "resources browser" from your server. Click on the image you wish to insert, and that image will appear in the "preview" section of the Image Properties Dialog Box. Now, you can resize it if necessary, or set the alignment, using the command boxes on the left. Once you have done this (or you can just leave it as it is set), click "OK" and the image will be inserted into your document.
If the image you wish to add is not already available in your resources browser, you will need to upload it. Look below the list of files to the section that says "Upload a New File in this Folder", and click on "Browse".

The "Browse" button will allow you to look for files on your computer. Once you have located the image you want, click on that image; then click "Open". The pathway to that image will appear in the box to the left of the "Browse" button, and then you need to click on "Upload" to add it to your resources browser. Once it has been added to the resources browser, click on it, and it will be inserted into the document.
When you have added all your content and have the message looking the way you want it to, it is time to send a test message, so that you can make certain that the message looks the same when it is sent via email.
Once you have created your message, formatted it, and added any images or links, you should send yourself a test message to make sure that what you have written appears the way you intend it to when sent out. Scroll down to the bottom of the screen, and after you have saved the changes (click on "save changes"), go to the box for "send test message" and input your email address. Click on "send test message". After a moment, the screen will refresh and above the toolbar and headings you will see "sent test mail to "your email address" success". Then you can check your email and proofread the message. You will actually receive two messages - one in the enhanced format (with text boxes, logo, and photos) and the other will just be the text of the original message. If some of your users have elected to receive text-based emails only, they will receive this text version of the email.

If the message looks how you wanted it to, then you can proceed to send it out to the entire mailing list. If not, you can go back into "messages", find the message under "drafts", click on "edit" and make any changes that you want before sending it out.
Once you are completely satisfied with the content and appearance of your newsletter or update, it is time to send it out to the entire mailing list. To do this, pull up the message under "drafts" by clicking on "edit". (Or you may still have the tab open - in that case, just return to the document.)
Click on "lists", which will give you a listing of all the available mailing lists.
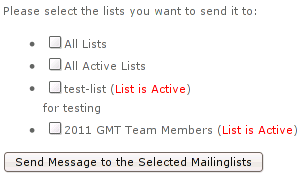
Click to place a checkmark in the box for the mailing list to which you want to send the newsletter, and then click below on the box which says "Send Message to the Selected Mailing Lists". Once you have selected this, it will bring you to a screen to initiate the final step you must take before the newsletter is sent out. Click on "process the message queue" and the message will be sent out to the entire list you have selected. Once you have clicked on "process the message queue", it will take two to five minutes (usually) for the message to be sent to the entire mailing list.
After the message has gone out, you will receive an email confirming that it has been sent, and listing the number of users it has been sent to, and how long it took to send the messages.
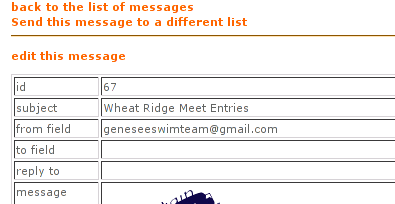
When you have successfully sent out a message, you may want to post it to the "Newsletters" or "Updates" section of your website. To do this, you need to go to the "messages" section in phplist, choose the message you just sent, and select "view".
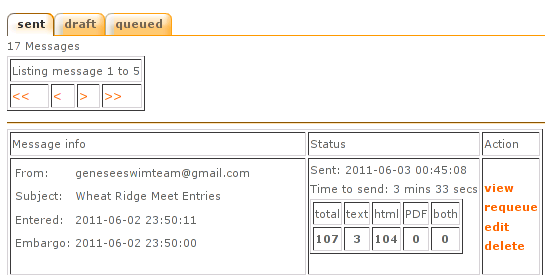
This option will display information about the message, including the message ID number in the top row. You will need this number in order to establish a link to the message.
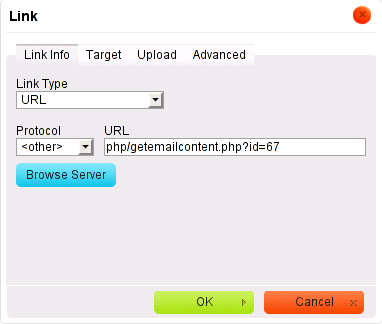
Once you know the message ID, you need to pull up the webpage where you want to post the link. Type in the subject and date of the message. Then highlight that text as you would to set up a normal link.
In the text box that appears when you click on the "link" icon, the "Link Type" should be "URL:" and for "Protocol", choose "other" from the dropdown box. Then type in the URL as:
php/getemailcontent.php?id=1 where "1" is the message ID number that you got from the "view" option in phplist.
Then open the tab that says " target", and choose "New window_Blank" so that the message will open in a new tab when the link is clicked. Click "OK" and the link will be established. Close out of the editor by clicking "publish" and double check that the link works.